Oh the stories that could be told…..

“It’s as pretty as chocolate pie, right before momma spreads the meringue on it.”

– The Honorable John H Graham

I have to give a big shout out to an old friend of mine, Cecil Holmes. Cecil and I are old college buddies from our days at Snead State. And just as it too often happens, we had kind of gone our separate ways. That is until I started seeing his work on Facebook, and his blog site, http://www.cecilsphotos.com. Talk about some cool pics, he has really created a unique style of shooting pictures. So several weeks ago I was fortunate enough to have him come up (he is truly a busy man on the weekends) to take some much-needed shots of several of my items.

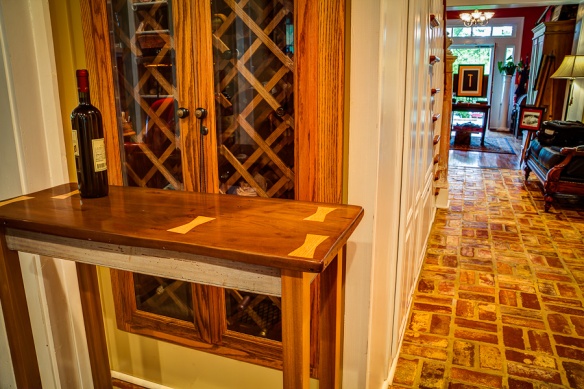
The picture above is of the Postal End Table that is photographed in the home of The Honorable John Graham. I loved how the light reflects off the top as if it were a mirror. Yet, the top is 120 year old wood reclaimed from the Wannville Post Office, finished with traditional Tung oil and a hand rubbed lacquer top coat.

Below is a new piece that I’ve added to the Postal Collection. I think it makes the perfect addition as a wet bar/ beverage stand. The top, again, comes from the Wannville Post Office. The stand was built from rough cut poplar wood that I collect from the farm, which I believe came from a dismantled shed.

And finally, here is the coffee table that currently resides in my living room. It was a storm casualty from 3 years ago and actually laid in our yard until January 2011 when I milled it with my chainsaw mill. Just as most of my pieces, I am always amazed with how something that is so rough, so dingy, and can seem so lifeless laid out in the yard, can be transformed into something so full of warmth and so full of vibrant color.

I had to include the shot below. The picture is of the Wann family standing in front of their home, which was still standing on the farm when I purchased it some 12 years ago. Looking back, I am really glad that I was able to salvage what I could out of the house before I dismantled it due to unrepairable decay. For instance, the grey stiles that I use for the Postal End Tables and the Postal Entertainment Bar were originally part of the wainscoting in the house. And the tops were originally the shelves of the Wannville Post Office. So what better way to preserve the past than to be able to bring it into your home as a piece of furniture. I think it can best be stated as follows:

“The patina of each piece is alive with the history of the past, of the people who operated the Wannville Post Office, the folk who came there to mail letters to far off kin and others who came there hoping to hear from a loved one gone from sight, but not heart.  It’s a real “if this table could talk” feeling to me–I can’t help but think of the lives its touched, of the goods sold across the old store counters, of the stripped coconut candy bars it held and the plugs of tobacco cut on it.  All of the emotions, hopes, dreams and wishes it has witnessed seem embodied in it as it becomes part of our home, our family.  I hope that we will have it for many years yet unrealized and, one day, it will trundle off to a new home, with a new family, bearing a little bit of our history mixed in with all the archive it now holds.” …Another great statement from my friend, Honorable John Graham.

Thanks again to Cecil Holmes for the photos. Will Parks for the use of your lovely, exotic office. And to John Graham for the use of your home, as well as all the literary inspiration.

How to Fix Celotex Ceiling Tiles

Over the last couple of years I’ve had at least a dozen calls concerning Celotex ceiling tiles. The reasons for these calls can range from the ceiling having a wet spot from a leak, tiles being damaged to the point that they are sagging, or the customer wanting to change the looks of their ceiling.

So you may be wondering, what is Celotex ceiling tiles? The pic to the right shows some Celotex tiles (CT). CT was a product that was used in the past to cover ceilings. If I had to guess I would say it was something that was used up until the early to mid 80’s (based on past work experience) when sheet rock became the staple for all wall and ceiling coverings. It usually comes in 12″ x 12″ tiles that fit together much like the new laminate flooring does. These tiles were stapled over some type of backing (plywood strips or 1×2″ furring strips) that were laid out on 12″ centers perpendicular to the ceiling joists. So if you look at the photo, wherever there is a seam there will usually be a furring strip used to attach the tile.

CT’s had some advantages. They were relatively cheap and easy to find as most building supply stores carried them. They were easy and fast to install, making them more feasible than to install sheet rock. And with the several choices in color, one could choose anything between a plain ceiling white to something as crazy as an off white with grey or gold accent lines (oops, sorry I hit the sarcasm button on my laptop). One other advantage, which at the time was not a big deal, was the fact that the tiles did add some insulation. Maybe not a lot, but they did help.

Now for the disadvantages. As is usually the case with things that are cheap and easy to install, they did pose a few problems when it came to maintenance. One problem is if they ever get wet, say from a leaky roof, then there is very little chance to remedy the situation. You can prime and repaint to take care of the stain, but if CT’s get too wet then the chances are good they will start to sag and even fall if the material breaks down. Also, if CT’s are not stapled sufficiently then that could cause them to sag. If you do develop a sag, they are almost impossible to face nail without damaging the finished side.

So, lets say you have a problem with your tiles and you want to fix them. Most people assume that the best thing is sheet rock. And if you’re a sheet rock prince/ princess living in a sheet rock palace, then yes, that is the best fix (Again, I hit that sarcasm button. Just to be clear I am not a hater of sheet rock. My house is a sheet rock palace. Although, I do wish I had more contrasting materials in my home other than boring old sheet rock.) But there is another option out there that, and given the age of your home, may make more sense.

 Yep, bead board. Its pretty easy to find at most home centers. It does cost more than sheet rock, but lets look at the advantages. Its more durable, it will last forever if installed correctly, and it will add a little something that most homes in your neighborhood are lacking: character.

The great thing about going over the CT’s (Remember that thing earlier that I said about a little added insulation. Now a days that’s a pretty big deal) is that the bead board is pretty easy to install. You just snug it up to the previous board and nail, at an angle, through the tongue of the board you’re installing. I use a 16 Ga finish nailer, with 2″ nails, and it’s nailed at every seam of the CT’s (every 12″). Thats all there is to it. Sure, it will not be perfect. There will be the occasional small gap in the grooves that will need some caulk attention. And there will be a few knots that will need some wood putty. But you know, its like a lot of things. Some may see it as being imperfect. I like to think of it as being rich in character, showing a certain patina that comes from years of use.

Thanks for visiting!

The Ivey Court presents the Wine Bottle Candelabra

This is probably one of my favorite times of the year. The weather is starting to turn off nice, with cool nights and warm days. The garden is planted (well, for the most part) and everything is nice and green. But the best part about this time of the year is that it’s finally time to start grilling again.

We live in a pretty unique and small house. So small in fact that we do not have a dining room, which is really not a big deal for us but it does kind of limit you on how many guest you can have over for supper. You can only sit so many people at a 4 person bar table, right? So some time last year around January, I decided to build an outside dining/ entertainment area. Nothing fancy, just a simple little “shed” that we could use on nice nights to grill and have friends over. I was able to salvage all of the lumber and posts needed from trees that were felled during the great Gravity Wave of 2009. And I did all of the sawing with my new chainsaw mill which I have featured in an earlier blog.

“The Party Temple”, as my wife calls it, has been an awesome addition to our home stead. We’ve hosted everything from birthday party’s, to Junior Progress meetings for my wife, a Scotch club meeting for myself, and a number of what I like to call our informal Supper Club gatherings. And for the most part it has lived up to expectations. We’ve kept everything about it simple, a string of Christmas lights, a Weber grill, folding tables, 2 TVs, and a number of gas lanterns are all the amenities we need. Yes, 2 TV’s are a necessity, especially if half of your friends are Auburn fans while the rest of us are Alabama fans and both games are on at the same time.

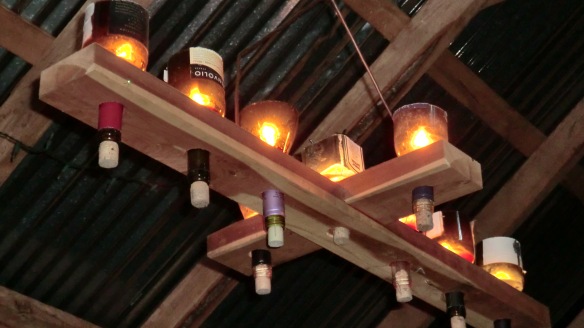
One thing I felt was missing was a centerpiece for the table, or a chandelier of some type. Again, it needed to be simple and preferably with candles as I felt it would add a certain ambience with the flame flickering off of the silver tin at night. So armed with an idea, an abundance of wine bottles, and some wood from the shop here is result.

The vessels for the candles were old wine/ liquor bottles that were destined for the garbage. I simply cut them in half and placed them in the holes. It is important to leave the corks in place. If not you will end up with candle splatter on the table once the wax melts down the neck of the bottle (we learned this the hard way). The wood was some leftover red cedar that I had at the shop and the hangar was a piece of ground wire that I took off of a salvaged power pole.

For the candles, I use a cheap, long federal style that you can buy from most retail stores (Target, Wal-mart, etc). I think they normally come 8 to a box. They last a pretty long time as the wax will melt to the bottom of the bottle and continue to encase the wick. In fact, the candles shown were left over from last year and they have already been used 6-7 times this year.

Each candelabra made at The Ivey Court is made one at a time and to the customers specifications. I’ve made them as small as for 4 vessels and as large as the one shown at my house. Of course, thats not to say they can not be made bigger. Please feel free to contact me at hunt22j@hotmail.com and I will be happy to work up an estimate based on the size and type of wood you would like.

Thanks for viewing!

Lumber Stretcher

I’ve often wondered how many times I’ve heard the expression lumber stretcher. You know the scenario. Here is how it often goes for me. Lets say I measure something in the shop, or at the work site, and I need a piece of wood that’s 45″ long. Well, this is when Murphy’s Law comes in to play as it is normally late in the day and everything I find measures 44 1/4″ or less. Frustration begins to set in as you go through the entire woodpile with no luck. Then someone chimes in from the peanut gallery “huh, huh, you gotcha lumber stretcher with you, huh, huh?”. And which I normally respond “No, jack%^&, I don’t have no lumber stretcher”. (At this point I’d like to apologize to all of my former English teachers. I generally try not to use phrases like “don’t have no”, but sometimes you have to relate to the audience your speaking to get your point across.”)

You see, the lumber stretcher is not real but rather a figment of the imagination amongst woodworkers/ carpenters. Its something we all wish existed as it would definitely help out, but in reality we know the trip to the lumber store for one piece of %^$& wood is inevitable.

I thought of the lumber stretcher the other day while I was working at a clients house. They had called me about changing out some doors due to the old ones having been cut off to accommodate carpet, which worked fine until they decided to install hardwood flooring. You guessed it, now there was an 1 1/2″ gap between the doors and floor. Upon closer investigation (after the new doors were purchased) I found the doors had not been cut off but rather installed at that height, which now meant we needed to remove the trim and door jambs and lower the entire door assembly. One problem: there was wallpaper on the walls. So lowering the jamb and trim would have left a gap at the top with no wallpaper. Here is where the frustration was beginning to set in and I wanted to say ” no jack&^%, I don’t have no lumber stretcher”. Breathe, 1, 2, 3,…breathe. But wait, maybe we could in fact stretch the doors.

Off to the shop with two doors. I found 2 pieces of solid wood (one poplar and one red oak) and milled them both down to 1 7/16″ x 1″. Most off the shelf doors are 1 3/8″ to 1 7/16″ thick in case you’re wondering how I came up with that number.

I then sanded both the bottom of the door and the wood to feather the edges (in order to give the glue the best chance to hold sufficiently). Once sanded, I marked and cut two sets of biscuit slots, 3 on the front and 3 on the back. Add a little glue, spread it evenly on both mating  surfaces and then assemble.

Here is where the tricky part came in to play. Most doors have a 5 degree bevel cut on the handle side to help ensure that the door does not hit the jamb when being opened and closed. So I had to come up with a way to carry that bevel down to the new wood. I clamped two pieces of wood (one on top and one on bottom), flush with the edges and the bottoms of the door. Then using a flush cutting router bit, I was able to trim a perfect edge with an identical bevel as the door edges.

Once assembled there was a seam between the door and the wood. This was due to the door having a very small chamfer edge. Not a problem as I filled it with a 2 part wood filling putting, leaving it a little proud, and then sanded with a random orbital sander once it was dry. The picture to the left illustrates the repair with only one coat of primer. One thing to keep in mind is to follow the wood grain of the door with the new repair. Also, some heavy brush stokes will help to add some of the graining which will blend the repair in with the door.

That’s all there was to it. Two hours in the shop vs. multiple hours at the clients house. Plus they do not have to look into replacing their wallpaper. Definitely something to keep in mind should you ever find yourself needing a lumber stretcher for a door.

The amazing power of a biscuit

Maybe its a Southern thing, but I like biscuits. Sausage biscuits. Biscuits and gravy. Biscuits and honey butter. Wood biscuits. Bologna biscu………wait, did I just say wood biscuits? Yep, wood biscuits. And what are wood biscuits you may ask? Well, the pic on the right shows a handful of them.

They have actually been around the wood working circuit for quite some time. Many people use them when they join 2 boards together, be it a mitered joint (say a picture frame), a butt joint, or parallel boards (a table top). The cuts are made with a special cutter, shown to the left. Look closely and you’ll see it is basically just a saw set up on a side grinder. When the base is pushed against the wood a slot is cut that will accept the biscuit.

I primarily use biscuits when I glue my countertops. They are not necessarily for strength but more for helping to align the boards during the glue-up. My method is to run the boards through a jointer to insure both edges being glued will meet up without any gaps. Of course, this is something that normally requires the use of a jointer hand plane to tweak the fit. Once I have my boards laid out and everything fits nicely, I will mark the biscuit location on both boards and make the cuts needed. This pic shows the cut slot(s) with the glue line being dispensed.

The trick to the glue is to not use so much glue that it squeezes out during the clamp-up, creating a big mess (stain does not cover up glue which means it will need to be sanded / planed off entirely from the surface). The other thing to remember is that for a foolproof joint you need to have the entire glue surface covered in glue. This is best done with an old paint brush. Or my favorite is an old toothbrush, which is fairly easy to clean up and reuse (gluing, that is, not brushing your teeth).

If done properly, you’ll have edges that match up fairly close (a hand plane can be used to level out any differences) with very few gaps and very little glue squeeze-out.. Small gaps are acceptable as they can be filled prior to finishing, but large gaps can cause a weak joint.

And here is the almost finished product. Notice the joint where the two boards were joined. Pretty hard to find? I’d say that’s exactly what we were trying to accomplish. Now all that is left are 4-5 coats of lacquer and then to hand rub the surface for a rock hard, yet mirror-like finish.

Work Progresses on the Wood Kiln

I wanted to post some pics of the construction of the wood kiln. The progress has been a little slow as I’ve been working on it in the afternoons, but its beginning to look like something. The pic to the right shows the installed floor. Originally I had intended on using pressure treated plywood, but that would have cost me close to 40.00 per sheet. So I opted to use a OSB plywood that was only 12.00 a sheet. The problem with OSB is that it can become damaged when exposed to moisture, which could pose a problem. So to help waterproof it, I coated all sides with Silver Dollar Aluminum roofing sealant which I was going to do anyway for the inside wall coatings.

For the framing material, I was able to salvage some damaged lumber from one of our local hardware stores. It was a little bit of work pulling nails and separating them. But they were free, and seeing that both sides would be covered, I think they worked just fine.

See, with the outside siding on, no one will ever tell that the lumber was not shiny and new. Btw, the siding is the cedar that I showed in a previous blog that I cut with my sawmill. It’s just rough cut to 1″ thick, and nailed on in a board and batten pattern. With it being cedar it should hold up pretty well to the elements. And like the framing material, it was my favorite kind of wood, free wood!

And finally, this is a pic of the back part of the roof. I had the shingles from a previous job and they had been riding in the back of my trailer for well over a year. I had tried to give them away several times but never had any takers, which I am really thankful for now.

All in all, I’m pleased with how everything is coming together. I’ve been trying to build this thing as cheap as possible, while at the same time trying to keep it from looking like something just cobbled together. I think the total bill as of right now is at 90.00 out of pocket money, with 2/3 of that being for the 5 gallon bucket of roof sealant. Hopefully the next progress report will have the rest of the roofing installed and maybe some doors/ siding. Now if I can just score some cheap fans for the inside….

Postal End Tables

Several weeks ago I was sitting in the living room, watching tv with Bridget and Eli, when I started to think about things around the house that had not been addressed yet. There is that barn door that I’d like to make for the office, which to be honest I keep thinking I may find one some day that will work. And then there are cabinets in the kitchen that need a face frame and a coat of paint. Oh yeah, and I need to do the same thing for our upstairs built-in closets. But one thing that’s been getting a lot of consideration has been our end tables. Up until Wednesday we had been using two old wine crates. They were nice as they were very unique, which I really like. But they were skinny, and pretty light weight, which made them easy to turn over. What to do?

I started at my warehouse (in other words, dad’s horse barn loft) where I keep a lot of my finds and came across this 1 1/2″ thick board (part of a stack of 15 or so). They were originally in the Wannville Post Office, which I was able to salvage sometime around 2003 or so after I purchase my farm. To be honest I had forgotten about having them. Initially, I thought they were walnut by the look of the end grain and the color. But once I started cleaning them up (lightly sanding) I figured out they were poplar. The interesting thing was that the darker color was actually from many years of use as a shelf and the fact that the heart wood had a green tint to it. In fact there was only about 2 inches along the side that were not heart wood, which was probably due to the size and age of the tree. Also, I’m not sure what the holes in the side were used for, but I definitely like the way they look. And once I cross-cut the piece to make two tops, it left me with 2 tops measuring 14×18″.

For the stiles (sides of the tables), I decided to use some of the tongue and groove wainscoting that came out of the Wann house (also a salvage from the old house on our property). All I did was planed the back side, sized them with the table saw, and then used my dado blade to cut tenons on the ends to accept the legs.

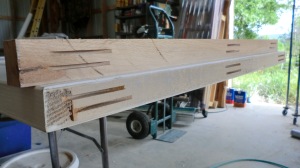
For the legs, I used a left over piece of a crossbar. You see these everyday as they are the horizontal pieces located on power poles that hold up the utility lines. The piece was 3×4″ so I roughly quartered it to get eight 1 1/2″x 2″ legs. A run through the planer, some hand sanding, and drilling the slots for the tenons and they were ready for glue up.

So here is the finished product. The legs and backs of the stiles got a coat of Tung oil, which helped to tone down the freshness of the planing. The tops got 3-4 coats of lacquer prior to assembly. And once everything was put together I sprayed an additional 2 coats on the legs and tops.

 Everything worked out great on these two tables. I really like the way each piece reveals some history for how they were once used. I also like how I was able to keep the little round-over detail on the stiles (in the pic above you can see it on the red stile). Its little details like this that I think add a lot to a piece of furniture. They both measure 18″x14″, stand roughly 22″ high, and will fit in nicely with our living room furniture. Plus they are solid enough that we no longer have to worry about “Destructo Boy” turning them over!

Please feel free to comment your likes/ dislikes as I’m always open to constructive criticism. And if you see something you’d like for purchase, please feel free to email me hunt22j@hotmail.com . I can always reproduce (or come up with a new design) a product that will meet your wishes/ desires.